13 Adding Media
Pieter van der Veen
How to Upload Image Files
There are two ways to upload images files:
- from the left-side dashboard menu, you can access your media library and add or delete files or
- as you’re writing, you can insert media in a chapter, front matter, back matter or part.
Uploading media files using the media library:
- Go to your dashboard.
- Click on Media.
- Your library will appear.
- Click Add New either in the left menu or at the top of the main panel.
- A screen will appear where you can upload your images.
- You can drag files from your computer onto this screen.
- Or, click on Select Files to browse for the correct media files on your computer. Click on the file names and the files will upload.
- To edit files you have uploaded, click on Media Library.
- Hover over a file to see the options, then click Edit.
Uploading Image Files from Within a chapter
- Go to the chapter in which you would like to add an image.
- Put your cursor where you would like the image to appear.
- Click on Add Media.
- The Insert Media screen will appear. An interface will appear with the option to drag and drop or select files.
- You can also find and select a file that you have already uploaded previously by clicking on Media Library.
Upload Image from URL: When you are uploading media from within a post, you can also click on Insert from URL to pull in a link to a photo on the Internet. This image will not be added to your media library.
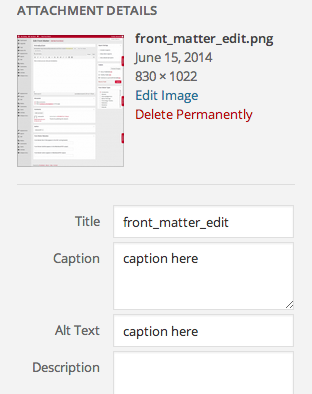
Once you’ve uploaded your image and inserted it where you want it, for best results, you’ll want to give it some styling.
- Once your image uploads, click on it.
- The Attachment Details menu will appear to the right.
- Give your photo a caption. Photos without captions will not render properly in all e-readers.
- It’s best practice to write Alt Text, which will be read to visually impaired readers by a screen reader or accessibility device.
- Add a Title and Description for your image here.
- Scroll down.
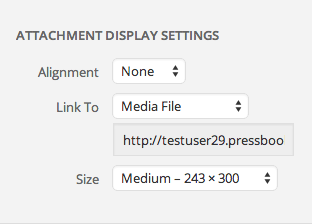
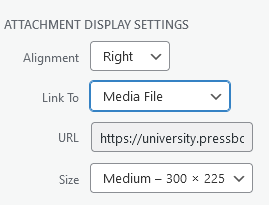
Customize how an image displays
- Select the preferred alignment for your image.
- Have your image link to itself, or somewhere offsite.
- Choose the size at which your image will display. (You’ll want to know your publisher or bookstore’s specs.)
 All in all it is important to give your media(image) proper metadata: Title, Caption and Copyright attribution, the latter will appear on hovering over the image
Make a Thumbnail Open as a Larger Image in a Webbook
To have a thumbnail image open into a larger image in a lightbox, follow these steps:
- Open your chapter
- Click Add Media to choose from existing images in your media library or upload a new image file
- Choose Thumbnail from the drop down menu under Attachment Display Settings > Size in the Add Media window
- Click Insert into chapter
Your image will appear in your Visual Editor.
- Click the image, then click the Edit icon,This will open up the Image Details window.
- Click the drop down menu next to Link To and choose Media File
- Click Update
- Click Save on your chapter
- Your image will appear as a thumbnail in your webbook, but open as a larger image once clicked.
Enabling and Using Lightboxes for Images
Using Lightbox, you can set the linked images in your webbook to open within a chapter webpage as a pop-up.
To enable this setting from your book’s dashboard:
- Click Appearance
- Click Theme Options
- Click Web Options
- Check the box next to Enable Image Lightbox
- Click Save
Click on the image to open the editor
Crop, Rotate, or Scale an Image
To access additional image editing options, select the Edit Original button beneath the image on the right side of the Image Details window. This will bring you to the Edit Image page.
Available image editing options include the ability to:
- Crop
- Rotate an image left or right
- Flip an image vertically
- Flip an image horizontally
- Scale an image to your custom pixel dimensions
- Crop an image to custom pixel dimensions and aspect ratio
- Select whether customized image settings apply to the thumbnail version of an image
You can also upload other files for example Word.docs, pdf or powerpoint using the add media button.
Importing and embedding media
There are three ways to embed content:
- Copy/paste the URL
- Use the Embed shortcode
First Step: Copy/Paste your URL into the Visual Editor (Chapter)
- Copy the URL of the video, audio, or other media
- Paste the URL into the Visual editor
- Click Save
- The best way is to rightclick on the video and get the video url: https://you.tu.be/y98se7uVXnnbnBw
Second Step: Use the Embed Shortcode
- Copy the URL or file name of the media
- Add the embed shortcode in the visual or text editor and paste in your file so that the shortcode wraps around it
- Click Save
This method also allows you to specify the height and width of your media embed.
Align embedded videos
When a video is embedded on a book’s webpage in Pressbooks, it aligns to the left by default. This alignment can be adjusted as follows:
- Enter the video URL. This action will automatically embed the video, which makes it difficult to align.
- Go to the Text (HTML) editor and locate the video’s URL.
- Click any part of the video URL.
- Return to the Visual Editor and you should see that the video has converted from its embedded form to its URL.
- Use the Align feature in the WYSIWYG toolbar to align the URL centre or right and click “Save.”
- Click “View Chapter” to navigate to the webbook. The embedded video should be aligned correctly. Note: While the embedded video will appear in the webbook, the Visual editor view will only show the video’s URL.
You can start a embedded you-tube video at a certain point by rightclicking and use command: “copy video url from current time”
The video starts at 2.40 https://youtu.be/4QfZb0Ve_bw
(An advertisement may be start up first)
You can upload video directly to the Pressbooks media library (necessary to use with a H5P interactive video), but because video files are often larger than the maximum file upload sizes, and because it’s difficult to find universal playback support for most video file formats.
In the case of videos, embedding from a dedicated video streaming service is almost always a better route to go. However, if ever audio or video is uploaded and inserted into a book, it will be handled in the same way as embedded media: displayed normally in the web and replaced with a missing element message in formats which do not support its inclusion.
An interactive video about OER
iframe restrictions
Pressbooks supports a wide variety of media and interactive content. However, some content is prohibited for the safety of readers and content creators.One type of embedded content we restrict is iframes. WordPress, the software Pressbooks is built on, blocks the creation of iframes for most users. If you attempt to embed an iframe into the Pressbooks editor, it will automatically be converted into oEmbed format instead – a safer standard for media embedding that limits the possibility of malicious use. If the media host isn’t compatible with oEmbed, your iframe may be stripped entirely.
The good news is that a lot of media sources already support oEmbed, which means that all you need to do is paste the link from the media source into your editor and the content will appear. This is true of YouTube, Vimeo, Facebook, Flickr, and a long list of other sources.
You can also visit https://codex.wordpress.org/Embeds for a full list of WordPress-approved content providers.
There are also some exceptional cases in which Pressbooks will allow iframes. We’ve evaluated a curated set of websites that don’t support oEmbed and globally permitted iframes from certain domains to be embedded across all networks. It is possible to embed an iframe from any of the following sources on our Global Iframe allowlist:
[media src=”https://youtu.be/PSFq6fAYuhw” caption=”Testvideo” /]
Test iframe
In text editor (html) paste the code you copied via share
<iframe title=”YouTube video player” src=”https://www.youtube.com/embed/Lqqsp8soXTo?start=7″ width=”560″ height=”315″ frameborder=”0″ allowfullscreen=”allowfullscreen”></iframe>
The video appears at the backend in the chapter but not online hence the iframe resctrictions.
